
 Partner Login
  Customer Support
  Fibre Termination
  Wi-Fi Routers
  Wi-Fi Access Points
  Value-added Services
 Sága Wi-Fi 7 Routers
Designed for peak performance and easy refurbishment.
Find out more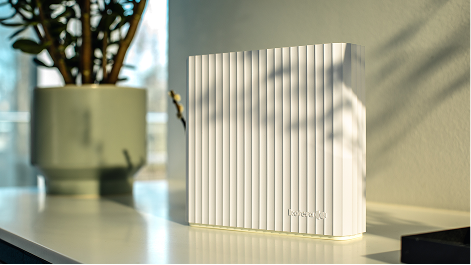


This page describes options to connect your Icotera i3560 access point to a router.
Topics
To cover your premises with a Wi-Fi signal, create a local network, which includes the router and up to three Icotera i3560 access points.
To connect your Icotera i3560 access points to the router, use an Ethernet cable or establish a wireless connection.
We recommend connecting your access points to the router with an Ethernet cable when possible.
After you extend your wireless network with an access point, you can connect your devices to the access point using the same access credentials as the router.
You can establish a wired connection between your Icotera i3560 access point and your router by using an Ethernet cable.
1. Connect the WAN cable to the Icotera i4882 or i4883 router.
2. Turn on the router and wait until the system and Wi-Fi LED indicators light solid green.
3. Turn on your Icotera i3560 access point and wait until the LED indicator lights solid white.
4. Connect the Ethernet cable to a free LAN port on the router. Next, connect the other end of this cable to a free LAN port on your access point.
5. Wait until the LED indicator on the access point lights solid green.
6. The access point broadcasts the same service set identifiers (SSIDs) for the 2.4 GHz and 5 GHz bands as the router.
You can use Wi-Fi to connect your Icotera i3560 access point with your router.
1. Connect the WAN cable to the Icotera i4882 or i4883 router.
2. Turn on the router and wait until the system and Wi-Fi LED indicators light solid green.
3. To set up the wireless connection, place the Icotera i3560 access point near the router. Turn on your Icotera i3560 access point and wait until the LED indicator lights solid white.
4. Press and hold the WPS button on your router for at least three seconds until the Wi-Fi LED indicator starts blinking blue.
Release the WPS button.
5. Press and hold the WPS button on your access point for at least three seconds until the Wi-Fi LED indicator starts blinking blue.
Release the WPS button. The router and the access point begin the pairing process, which takes up to two minutes.
6. Wait until the Wi-Fi LED indicators on the router and the access point light solid blue. After 15 seconds, the LED indicator on your access point starts blinking green. Next, the Wi-Fi LED indicators on the router and the access point light solid green.
7. Turn the access point off and move it to the target location. After you turn the access point on, the Wi-Fi LED indicator lights solid green, indicating that the access point is in operation mode. When choosing a target location, make sure that the access point provides at least 100 Mbps download speed. To measure the download speed, use Speedtest.
8. The access point broadcasts the same service set identifiers (SSIDs) for the 2.4 GHz and 5 GHz bands as the router.
You can change the connection type of your access point when needed. For example, you can improve the performance, latency, and reliability of your local network by connecting a wireless access point to the router with the Ethernet cable. Alternatively, you can increase the coverage of your mesh network by establishing a wireless connection instead of a wired connection.
Before you change the connection type of the access point, check that the router and the access point are correctly configured and fully operational. Make sure that the system and Wi-Fi LED indicators on the router light solid green. Also, make sure that the Wi-Fi LED indicator on the access point lights solid green.
After you disconnect the Ethernet cable between your access point and the router, the devices automatically establish a wireless connection within five minutes. You can turn the access point off, move it to a new location, and turn it on again.
After you connect the Ethernet cable to your router and your access point, the devices automatically establish a wired connection instead of a wireless connection.
To use your access point in another Wi-Fi network, reset your access point to the factory default settings.
Before you restore the factory default settings on your access point, make sure that the LED indicator lights solid green.
To restore the factory default settings on your access point, see Resetting your access point.
Before you restore the factory default settings on your access point, make sure that the LED indicator lights solid green.
This section includes suggestions and best practices for setting up a mesh network.
You can use Icotera i3560 access points, a gateway and optionally a switch to create a mesh network. You can include up to four access points with a single controller access point. The following image shows four common installation scenarios.
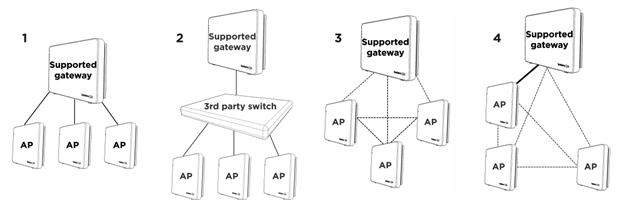
In the first scenario, you use an Icotera gateway as a controller access point. You use Ethernet cables to connect your access points to the gateway.
In the second scenario, you add an unmanaged third-party switch that is transparent to 802.1Q VLANs. You must use an Ethernet cable to connect your access point to this third-party switch.
In the third scenario, you use an Icotera gateway as a controller access point. You use Wi-Fi to connect up to three wireless Icotera i3560 access points to your gateway. Wireless access points can connect to the gateway or other access points, depending on the configuration of your mesh network.
In the fourth scenario, you use an Icotera gateway as a controller access point. You use an Ethernet cable to connect one access point. Also, you use Wi-Fi to connect up to two wireless Icotera i3560 access points to your gateway or other access points.
We recommend using the Ethernet cable to connect access points to your gateway or switch. When establishing a wireless connection between the gateway and an access point, expect up to 50% lower throughput.
Place your gateway so that it can cover most of the area. Add wireless access points only when needed. To cover multiple floors of a house, consider installing one access point on each floor.
The coverage areas of wired access points can overlap. In this case, the access points do not interfere and improve seamless roaming.
To reduce in-home interference, use an Ethernet cable to connect the gateway or access point with devices that frequently transfer large files.
After you install access points in your mesh network, check the download speed at all places on your premises. For wired connections to access points, the acceptable download speed is 200 Mbps. For wireless access points, the acceptable download speed is 100 Mbps. To measure the download speed, use the Speedtest application. For more information, see https://www.speedtest.net/.
The status LED indicator on the front side of the Icotera i3560 access point uses five colours to show the operational status. The LED indicator might be solid, blinking, or fast blinking. The normal state of the LED indicator is solid green, which means that the access point established an Internet connection. The following table describes the behaviour of the status LED indicators.
This section describes how to troubleshoot the issues that occur when you connect an Icotera i3560 access point to a router.
If the Icotera i3560 Wi-Fi LED indicator blinks red, then the access point has established the connection with the router, but the strength of this wireless connection is less than -82 dBm. Try moving your Icotera i3560 access point closer to the router or another access point.
If the i3560 Wi-Fi LED indicator lights solid red, then the access point did not obtain the IP address. Alternatively, the Internet connection on the access point is unavailable. Try restarting your router and your access point, and start the pairing process again.
If you create a mesh network that includes the Icotera i4882 or i4883 router, then you can check the connection status in the web interface of your router.
If the Icotera i4882 system LED indicator blinks red, then the router did not initialise or provision correctly. Try restarting your router, or resetting the factory default settings.
If the Icotera i4882 system LED indicator lights solid red, then the router did not obtain the IP address. Alternatively, the Internet connection on the router is unavailable. Try restarting your router. Make sure that you start the pairing process when the system and Wi-Fi LED indicators on your router light solid green.
If the Icotera i4882 Wi-Fi LED indicator lights solid red, then the router can establish a Wi-Fi connection with access points. However, the Internet connection is not available on the access points. Try restarting your router. Make sure that you start the pairing process when the system and Wi-Fi LED indicators on your router light solid green.